The right waterproof bag for motorcycle touring is the one that cannot open, migrate or shed a strap at highway speed after hours of rain and vibration. A bicycle bag that leaks ruins a day; a motorcycle bag that releases at 110 km/h becomes a road hazard for the rider behind, and a dangling strap can foul a wheel, a chain or a brake. That difference changes the whole design order. Retention outranks access convenience, a secondary tether outranks decorative webbing, exhaust clearance becomes a measured acceptance number, and waterproofing is a baseline rather than a selling point. This guide treats touring luggage as a restraint system that happens to carry dry gear.
What follows covers airflow peeling a roll-top, vibration walking webbing through buckles, hot-exhaust clearance as a hard 150 mm gate, how tank, tail and side loads change handling, keeping rain shells away from helmets and clean layers, usable capacity after three rolls, why four mount points still need an independent fifth restraint, road spray and fuel contamination, mounted testing before approval, logo durability in flutter and heat, and how a brand should assemble a defensible range. Production reference for this guide — QUANZHOU JUNYUAN BAGS, custom waterproof bags since 2014, 4,950 m² SGS-verified facility, MOQ 500 pieces per style, sampling in 6–10 working days, bulk in 35–50 days, FOB Xiamen.

A bag released at highway speed is a hazard, not an inconvenience
The first question to ask of motorcycle touring bags is not how much rain they shed but what stops them separating from the machine. Competent waterproof motorcycle luggage has a primary mount, an independent secondary tether loaded only after the primary moves, and no loose element long enough to reach a wheel, chain, belt, disc or hot pipe. Two hooks on one elastic cord are a single restraint, because one cut, one opened buckle or one slipped hook defeats both ends at once.
Separation produces three distinct costs. The rider may swerve or brake hard; following traffic receives an obstacle it cannot anticipate; and a strap that wraps the host machine can cause a crash without any collision. Retention therefore belongs in the pre-ride check alongside tyres, lights and fuel. A well-designed bag makes that check visual: buckles fully seated, roll count visible, strap tails captured, and a tether clipped to frame or rack structure rather than to cosmetic trim.
Brands should publish an operating envelope instead of an adventure-ready adjective. State the tested speed-equivalent airflow, maximum payload, approved mounting orientations and prohibited locations. A sample validated at 8 kg is not automatically approved at 16 kg, and a tail bag cleared transversely may behave differently mounted lengthwise. The declaration makes the test repeatable and prevents a customer from converting one result into a promise nobody made.
Finally, treat migration as a near miss rather than a cosmetic complaint. Record which strap moved, by how many millimetres, on which machine, over what road surface and at what payload. Ten millimetres of movement on a two-hour run matters if it carries the shell toward the silencer. The metric worth tracking is distance and hours without re-tensioning, not merely whether the bag was still attached at the end.
Airflow at touring speed can peel a roll-top closed at bicycle speed
Aerodynamic force rises approximately with the square of speed. Moving from 30 km/h on a bicycle to 110 km/h on a motorcycle does not triple the air load; depending on shape it can increase it by roughly an order of magnitude. A roll-top presented broadside to that flow acts as a scoop. Once air enters an imperfect first fold, the fabric inflates, the next fold relaxes, and the centre buckle becomes a hinge around which the mouth can peel open.
Orientation is a functional decision, not a styling one. The rolled mouth should face rearward or sit beneath a compression flap so oncoming air presses it closed rather than prising it open. Require at least three clean rolls after the bag is loaded, and print a maximum fill line that leaves enough collar to achieve them. A capacity figure that only closes with two rolls is an overclaim, so usable litres must be quoted at three-roll closure.
- Add two side compression straps that cross the rolled collar and carry inflation load independently of the centre buckle.
- Keep the leading face smooth; open pockets, cord grids and vertical strap tails generate lift and audible flutter.
- Use a stiffener only where it prevents billowing, because a full rigid insert adds mass high on the machine.
- Place any air-release valve on a protected side face and lock it, since a protruding valve can be pushed open by cargo.
- Run the airflow trial in the least favourable legal orientation, not only in the neat catalogue installation.
A workable pass criterion combines condition and function. After two hours of turbulent airflow at the declared maximum speed with rated payload, the closure retains three complete rolls, no strap has slipped more than 10 mm, no free end exceeds 50 mm, and the bag has not rotated on the rack. Add spray in the final thirty minutes, because wet webbing has different friction from dry webbing and many buckles behave differently when wet.
Continuous vibration walks wet webbing through ordinary buckles
Motorcycles feed luggage a broad vibration spectrum from engine pulses, tyre impacts and road texture. The dangerous result is incremental slip: a ladderlock releases a fraction of a millimetre on each load reversal until a tight strap becomes a loose loop. Static pull testing misses it, because the same buckle may hold several hundred newtons perfectly under one steady load. Touring validation needs cyclic tension with modest peaks repeated tens of thousands of times, followed by a second static pull.
| Retention element | Motorcycle failure mechanism | Measurable acceptance rule | Design response |
|---|---|---|---|
| Acetal ladderlock | Wet webbing ratchets through under repeated load reversals | Less than 10 mm movement after 50,000 loaded cycles | Correct webbing thickness, aggressive bar geometry, always a keeper |
| Side-release buckle | Body flex or partial engagement opens after vibration | No opening and positive click after contamination cycling | Shielded position plus an independent compression strap |
| Metal cam buckle | High grip damages webbing edge and transmits vibration | No cut yarns after cycling; lever stays captured | Rounded cam, replaceable wear sleeve, tail keeper |
| Elastic hook cord | Creep removes preload and hooks rotate free | Not acceptable as the sole restraint | Surface compression only, backed by non-elastic webbing |
| Hook-and-loop strap | Dust and rain reduce engagement, then peel begins | Not acceptable for structural retention | Capture tails or bundle empty straps only |
Tail management is part of retention. A webbing end needs a stitched keeper, an elastic garage or a hook-and-loop wrap positioned so it cannot shake free. Cutting straps to one machine removes all adjustment range, while leaving 400 mm loose creates an entanglement hazard. A good dealer kit supplies two tail lengths and instructs the rider to roll and capture the remainder after final tensioning.
Attachment patches deserve the same fatigue logic. A strong D-ring welded or stitched to a weak local panel simply tears out a larger piece of shell. Spread load through a patch whose long axis follows strap direction, radius every corner, and test the complete mounted assembly rather than the ring alone. Component ratings cannot substitute for assembly evidence; the method is set out in our guide to strap and handle load testing.
Exhaust clearance: a 150 mm gate, then a hot-soak temperature test
A silencer and especially a catalyst region can radiate enough heat to soften a coating without ever touching it. The defect begins as gloss change or local tack, progresses to fabric shrinkage and weld creep, and can end as a hole once the softened panel rubs against a rack or strap. Because exhaust layout, shields and tune vary enormously, no single distance guarantees safety, but a conservative luggage brief should set 150 mm of free clearance from any exposed hot surface as the starting gate and reject an installation below 100 mm.
Measure with the machine fully loaded, suspension compressed to touring sag, the bag packed to rated volume and every strap tensioned. Take the shortest distance from the expanded bag or any hanging strap to the hot component, not from the rack rail. Repeat after a ride, because soft cargo settles and side bags move inward under compression. Where 150 mm cannot be maintained, fit an engineered rack or shield and validate temperature; reflective tape is not a shield.
The decisive test is a hot soak after road load. Bring the machine or an instrumented fixture to the declared worst thermal condition, hold the packed bag in its production mount, and place temperature indicators on shell, weld, foam, print and any plastic fitting. The sample passes only if every component stays below its supplier-rated service temperature with margin, and shows no tack, distortion, colour transfer or peel-strength loss after cooling.
This requirement shapes the range. A universal tail duffel can be approved for centre-rack use, while low side panniers should be declared model-compatible or supplied with a stated minimum rack geometry. A brand that implies universal side mounting accepts responsibility for exhaust layouts it has never measured. Polymer and adhesive temperature windows should be taken from the framework in thermal resistance of waterproof materials rather than from a fabric trade name.
Tank, tail and side loads change how the machine steers
Where mass sits changes steering, braking and low-speed balance. A tank bag lies near the combined centre of mass and keeps small dense essentials reachable, but a tall one interferes with handlebar sweep, rider posture and the instrument view. A tail bag is convenient and narrow, yet weight carried behind the rear axle unloads the front and amplifies pitching. Side panniers keep mass low but add width in traffic and yaw the machine if one side is heavier.
| Location | Practical payload discipline | Dynamic penalty | Best contents and geometry |
|---|---|---|---|
| Tank bag | About 3 to 6 kg, subject to the machine manual | Too tall restricts steering and rider movement | Documents, camera, snacks and electronics in a low-profile quick-access shell |
| Seat or tail rack | About 6 to 12 kg within rack rating | Mass high and rearward can lighten steering | Bulky light clothing in a transverse body with four-point restraint |
| Paired side panniers | Balance left and right within about 1 kg | Added width and yaw if packed asymmetrically | Dense tools low and forward, soft kit above, mirrored internal layout |
| Rider backpack | Keep light, generally below 5 kg on long stages | Fatigue and injury load in a fall | Hydration and immediate essentials only; no hard tools |
Pack dense items low, forward and close to the centreline. Put a tool roll at the lower front of a pannier rather than on top of a tail bag, and split water between sides. Weigh each loaded side bag on an ordinary scale, because visual balance is unreliable. Record the ready-to-ride weight on a writable label so the next morning’s repack does not silently move four kilograms to one side of the machine.
Capacity planning should start from the rack rating and the vehicle manual rather than from a clothing list. Luggage volume invites the rider to exceed what the mounting structure or the machine permits. Brands should not publish a payload that appears to override the vehicle maker, and the product label should state plainly that the lower of bag, rack and motorcycle limits governs.
Rain shells, helmets and clean layers need separate zones
A rain shell comes off saturated with road water, sweat and grime. A helmet has a scratch-sensitive visor, a moisture-absorbing comfort liner and ventilation passages that should never be packed against that shell. Putting both in one waterproof cavity wets the helmet from the inside even though no rain crossed the bag. A touring system therefore needs a drainable wet zone and a clean padded helmet zone that exchange neither liquid nor abrasive dirt.
For roadside speed, the wet zone should open without unpacking the whole load. A coated external sleeve of 8 to 12 litres accepts jacket, over-trousers and wet gloves, with a drain eyelet directed away from the exhaust and from the wheel spray path. It is deliberately water-containing rather than submersible. The dry core carries insulation, documents and electronics behind a roll-top or a protected waterproof zipper.
Helmet storage needs shape and surface control more than a high ingress rating. Use a 25 to 35 litre clean bag with a soft removable liner, no exposed hook-and-loop facing the visor, and a mouth wide enough that shell edges do not scrape the closure. Never hang a helmet from a mirror in wind, and give an externally mounted helmet bag its own rated restraint rather than a drawcord loop. Our helmet protection and storage guide covers the geometry in detail.
Separation also improves the hotel routine. The rider carries the clean helmet and valuables inside while dirty outer luggage stays on the machine, then rinses the wet sleeve separately. A removable light-coloured liner makes grit visible before it scratches anything and gives dealers an inexpensive spare part to stock, which matters more to a touring customer than another pocket.
Usable litres after three rolls and mounting width
Nominal litre figures mislead on a motorcycle, because the top collar cannot be filled and the mounting surface imposes dimensions. A 40-litre cylinder may measure correctly when open yet offer only 32 to 35 usable litres once three rolls are taken. It may also overhang the rack, obscure an indicator or project into the exhaust envelope. Specify both closed external dimensions and usable three-roll capacity measured by a stated packing method.
| Touring module | Usable capacity target | Mount and typical contents | Procurement decision |
|---|---|---|---|
| Tank access bag | 5 to 12 L | Harness or ring mount; documents, power bank, camera | Low profile, sealed or covered access, clear steering check |
| Tail day bag | 20 to 30 L | Four-point seat or rack mount; spare layer, food, shoes | Transverse body, compressed front face, secondary tether |
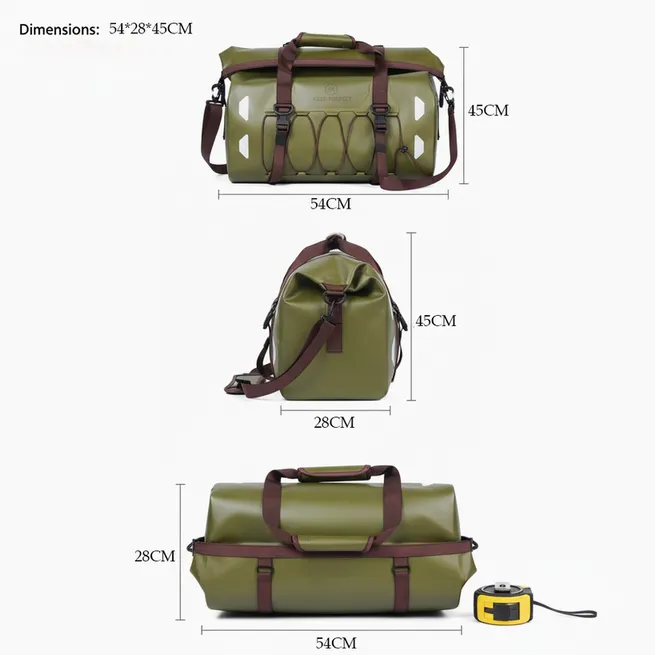
| Touring duffel | 35 to 55 L | Rear seat or rack; light clothing and sleep kit | Three-roll usable volume, six lash points, no loose carry strap |
| Soft pannier pair | 25 to 35 L each | Rigid rack preferred; balanced tools and clothing | Heat-side shield, replaceable abrasion panel, left-right ID |
| Rain-gear sleeve | 8 to 12 L | Outside the clean core; wet over-suit and gloves | Drainage, fast access, high-visibility pull |
| Helmet carrier | 25 to 35 L | Hand carry or secure top position | Soft lining, wide opening, visor-safe interior |
A coherent range does not need six unrelated constructions. One welded shell platform can serve a 25-litre tail bag and two 30-litre panniers, while a small padded tank bag and a removable wet sleeve use simpler sewn construction. Shared buckles, webbing and colour reduce development risk while geometry still reflects the mounting load. The general method in our dry bag capacity guide applies once three-roll loss is included.
With a 500-piece minimum per style, avoid fragmenting the first buy across every volume and colourway. A defensible launch is one 35 to 45 litre tail duffel in two colours within a single production style, ordered with universal strap kits as separate items. Add panniers only after model compatibility and heat geometry are proven. Colour variants may share material purchasing, but each style still needs its own quantity and inspection plan.
Four mount points still need an independent fifth restraint
Four tension points stop yaw and fore-aft movement, but they can still share a failure. If all four attach to a removable passenger-seat plate, loss of that plate defeats the entire system. The independent tether should connect bag structure to a separate frame or rack point, remain slightly slack in normal use, and carry load only after primary movement. Its route must clear suspension travel, steering, wheel, chain, belt and exhaust.
- Use non-elastic webbing for every structural path and reserve shock cord for compressing surface loads.
- Route forward straps forward and rear straps rearward so opposing vectors locate the bag instead of only squeezing it.
- Capture hooks against opening; a hook that can unload over a bump is not highway retention.
- Fit sleeves or pads where straps cross paint, but do not let a pad hide progressive loosening.
- Remove or positively secure any shoulder strap before riding; a loose carry strap is long enough to reach moving parts.
- Print a pre-ride tug, roll-count and tail-capture check on a durable label attached to the bag.
Mounting loops should be obvious and directional. Colour-coded front and rear loops reduce crossed installation, and a diagram printed under the flap survives long after the paper manual is lost. Loops need clearance for gloved hands without projecting far enough to catch a boot. A daisy chain is useful only if every bar tack is rated and the instructions identify which cells are structural.
Accessories should be sold as an approved system: four primary straps, one contrasting tether, tail keepers, paint sleeves and two spare keepers, all traceable to the tested configuration. Allowing dealers to substitute elastic cords or untested hooks invalidates the bag test. Hardware and webbing choices are easier to specify with our notes on custom buckles, straps and fittings.
Road spray adds fuel film, grit and brake dust to plain rain
Motorcycle luggage does not meet clean water. Rear-wheel spray carries fine mineral grit, road oil and brake dust; gloves transfer fuel at a filling stop; insect residue and chain lubricant add further chemical load. These contaminants attack prints and soft coatings, while grit turns every strap contact into an abrasion site. An ingress rating says nothing about chemical compatibility, so fuel splash and cleaner residue need their own coupons.
A welded TPU-laminated woven shell is a sound platform because it combines a wipe-clean face with controlled seams, but buyers still need the exact film and adhesive system identified. Test coupons against short fuel splash, diluted road cleaner, sunscreen and insect remover, then inspect for swelling, tack, colour transfer and retained peel strength. Mimic wipe-off exposure rather than prolonged immersion unless soaking is genuinely part of the use case.
Zone the abrasion resistance instead of making every panel heavy. The rack face, lower pannier corners and strap contact bands need doubled or replaceable patches; the top face can stay lighter. A removable base sheet prevents bolt heads and rack edges printing through the shell. Material selection under mixed contamination is covered in chemical resistance of waterproof materials and abrasion-resistant exterior coatings.
Care instructions should say rinse grit off first, then wipe with mild soap, because rubbing a dry dirty surface drives particles through the print and coating. Pressure washers are inappropriate: they force water into closure laps and can lift badge edges. Dry the bag open, inspect under strap patches, and never lay a wet shell against a hot exhaust to speed drying.
Approve the sample mounted, loaded, wet and hot
Bench testing screens materials; mounted testing validates the product. A minimum programme includes closure water exposure, loaded vibration, turbulent airflow, repeated mount and remove cycles, strap contamination, abrasion against the production rack, and a hot-exhaust clearance trial. Sequence matters, because a pristine sample can pass ingress and then leak after vibration creases the roll collar or heat softens a seam.
Use a production-representative machine or fixture with the declared rack geometry. Pack to rated payload using dense and bulky simulants, measure strap tension, photograph every route and mark webbing at each buckle. Record movement in millimetres after each stage, and finish with a spray test while the bag is still warm and vibrated. Opening the bag between stages can conceal a progressive seal problem.
Independent methods already used across vehicle and materials programmes are the right reference base. ASTM International publishes relevant material and environmental methods, ISO provides controlled testing frameworks, and SAE International is the natural reference culture for vehicle vibration and thermal validation. A plan should name the adapted method, conditioning, fixture, load and pass line rather than cite a logo.
The release report should be short enough to use: declared payload, speed-equivalent airflow, cycle count, maximum strap slip, peak shell temperature, water result, and photographs before and after. Keep a sealed reference sample and retain the exact webbing lot, since friction changes with weave and finish. Seam evidence can follow our waterproof seam integrity methods once motorcycle conditioning has been applied.
Logos must survive flutter, heat and road-cleaning chemistry
A logo on the leading face takes turbulent flutter and insect impact; one on the rack face is ground away; one near the silencer heat-ages. Place the principal mark on a protected side or upper panel that stays visible when mounted, away from fold lines and strap paths. A welded badge or a flexible ink system generally tolerates shell movement better than a thick rigid transfer, but only a test on the actual laminate settles it.
Reflective identity helps conspicuity, but it should never be sold as vehicle lighting or placed to imply a regulatory claim. Use narrow reflective accents on outward and rearward faces, keep the main logo in a durable non-reflective method, and cycle both through wash, ultraviolet, heat and flex. A reflective film that looks perfect when new can crack exactly where the bag compresses every day.
Dealer and tour programmes gain more from identification than from oversized graphics. Add a writable owner field inside the clean flap, a heat-side label on panniers, and left-right marks visible during mounting. Serial or batch codes help trace strap changes. Process trade-offs are set out in our custom logo options guide; embroidery should stay off a welded waterproof chamber unless it is backed and sealed.
Colour has a maintenance role too. A dark lower zone hides brake dust, while a lighter roll collar makes closure folds and damage visible. High-visibility pull tabs help at night without turning the whole bag fluorescent. Test colourfastness after road cleaner and heat, not only under light exposure, and approve a physical production standard rather than a screen rendering.
Writing an enquiry that suppliers can actually quote
A useful request for quotation begins with motorcycle class, mounting surfaces, exhaust geometry, declared payload, speed envelope and trip length. Then state usable closed dimensions, minimum three-roll closure, the 150 mm hot-clearance gate, maximum 10 mm strap slip, an independent tether, the contamination set and the required test sequence. That is enough for a supplier to decide whether an existing platform fits or whether mount geometry needs development.
Quote accessories with the bag, because they define the tested system: four primary straps, a contrasting safety tether, tail keepers, paint sleeves, a removable wet sleeve and a care card. Order spares in the same production run. Buckles and webbing change over time, and a replacement that looks equivalent may have different friction, which invalidates the original slip result. Inspection should tension every structural buckle and verify bar-tack count, not merely check colour and dimensions.
Assortment economics argue for concentration. Hold the first order at 500 pieces per style and put validation effort into one core tail duffel rather than splitting demand across unproven pannier geometries. Samples should be mounted on at least two representative machines, including the most difficult exhaust-side condition. Keep signed photographs of approved routing with the specification so a later production team cannot reinterpret strap placement.
If the line passes those gates, review the process from first sample evaluation through bulk bag production and send the mount drawings, rated payload, usable volume, target markets, branding files and test matrix. Sampling should settle retention and temperature before cosmetic revisions; bulk approval should use the same loaded configuration that made the sample acceptable.
Pre-departure checks riders and dealers can run in two minutes
- Confirm three complete rolls and that both collar compression straps are tensioned, not merely buckled.
- Check that no strap tail exceeds about 50 mm and that every keeper is closed.
- Verify the secondary tether is clipped to frame or rack structure and is slack in normal position.
- Measure the shortest distance from loaded bag to the hot exhaust; reject anything under 100 mm without an engineered shield.
- Weigh loaded side bags and keep the difference within about 1 kg.
- Keep rain shells in the drainable wet sleeve and the helmet in the clean lined zone.
- Re-tension after the first 100 km of a tour and after any unpaved section.
These checks are worth writing on the product rather than in a manual, because they are performed in the dark, in rain and with gloves on. A printed label costs almost nothing and prevents the two failures that dominate touring complaints: a strap that walked loose and a wet shell stored against clean kit.
For brands, the same list doubles as a dealer-training script and as a returns triage tool. When a claim arrives, ask which check was last performed and what the measured clearance was. Most touring failures are installation and maintenance drift rather than material defects, and a supplier that documents that distinction protects both warranty cost and reputation.
Two closing cautions. Never dry luggage on or near a running machine, and never assume a mounting that worked on one motorcycle transfers to another. Retention is a property of the machine, the rack, the bag and the rider together, which is precisely why touring luggage deserves a mounted test rather than a catalogue photograph.
Frequently Asked Questions
Q1. What makes a motorcycle touring bag different from a bicycle dry bag?
Airflow, vibration, exhaust heat and the consequences of a dropped load are all far more severe. A touring bag needs a declared speed envelope, redundant restraint, captured strap tails, measured hot clearance and mounted testing. Waterproof fabric alone does not make luggage safe at highway speed.
Q2. Can highway wind really open a roll-top closure?
Yes. Air force rises roughly with the square of speed, and a broadside roll can act as a scoop. Face the roll rearward, keep at least three full folds after loading, add compression across the collar and validate in turbulent airflow with rated payload.
Q3. How far should a soft bag stay from the exhaust?
Use 150 mm of free clearance from an exposed hot surface as a conservative gate and reject an installation below 100 mm without engineered separation. Measure loaded at touring suspension sag, then run a hot-soak temperature test because exhaust designs vary widely.
Q4. Does a heat shield remove the need for clearance?
No. A shield reduces radiant and contact heating, but its effect depends on material, air gap, coverage and airflow. Measure bag temperature during a loaded hot soak and keep margin below every component service limit. Reflective tape is not an engineered shield.
Q5. Why do luggage straps loosen on a long ride?
Repeated engine and road vibration reverses tension across the buckle, letting wet webbing walk through in tiny increments. Test the specific webbing and buckle together under cyclic load and capture the free end. High static strength does not predict slip resistance.
Q6. Is elastic shock cord safe for mounting a bag?
Not as the primary or only restraint. Elastic loses preload, hooks can rotate free when suspension unloads, and long cords can reach moving parts. Use non-elastic webbing for structure and reserve cord for compressing a jacket or other surface load.
Q7. Where should heavy tools be packed?
Low, forward and close to the machine centreline, normally in the lower front of paired panniers. Weight high and rearward behind the axle lightens steering and amplifies pitching. Weigh each side and keep the difference within about 1 kg.
Q8. How many rolls does a touring dry bag need?
Three complete folds after loading. Capacity should be quoted at that closure state, not to the unclosed rim, because a bag that only reaches two rolls at catalogue volume cannot resist airflow inflation reliably.
Q9. Should a rain shell share a compartment with the helmet or clean clothes?
No. A wet shell carries road water, sweat and grit that will wet and abrade a helmet liner or visor. Use a drainable external sleeve of 8 to 12 litres for wet kit and keep a clean lined zone for the helmet and electronics.
Q10. What is an independent secondary tether?
A restraint attached to a separate frame or rack point that stays slack in normal use and takes load only after the primary mount moves. It protects against the shared failure of four straps that all rely on one removable seat plate or bracket.
Q11. Do I need a rigid rack for soft panniers?
Strongly preferred. Soft bags without a rack can migrate toward the wheel or exhaust, and they lose shape under load. Where a rack is impossible, declare model compatibility and validate clearance, temperature and strap slip on that specific machine.
Q12. Can I put a bag on the rider backpack instead?
Only for light essentials, generally below 5 kg on long stages. A backpack adds fatigue and an injury load in a fall, and hard tools against the spine are a poor idea. Heavy items belong on the machine, mounted low and forward.
Q13. How should I clean road spray and fuel splash off a bag?
Rinse grit off first, then wipe with mild soap and water. Never rub a dry dirty surface, since that drives particles into the coating and print. Avoid pressure washers, which force water into closure laps and can lift badge edges.
Q14. Which tests should a touring bag pass before bulk approval?
Mounted water exposure, loaded vibration with slip measurement, turbulent airflow at the declared speed, repeated mount cycles, strap contamination cycling, rack abrasion and a hot-exhaust clearance trial with temperature indicators.
Q15. Which logo method survives flutter and heat?
A welded badge or flexible ink system on a protected panel usually outperforms a thick rigid transfer, because it moves with the shell. Keep marks off fold lines and strap paths, and cycle them through wash, UV, heat and flex.
Q16. What payload should a manufacturer declare?
The tested payload, with the reminder that the lower of bag, rack and motorcycle limits governs. A declared figure should be tied to a mounted test condition rather than to the volume of the empty bag.
Q17. Why is the minimum order quantity 500 pieces per style?
It covers tooling setup, material purchasing and a stable inspection plan for one construction. Splitting the first buy into many styles raises unit cost and risk, so concentrate volume on one validated core product and add variants later.
People Also Ask
What makes a bag suitable for motorcycle touring?
Retention at speed, vibration-resistant straps, measured exhaust clearance, low and balanced load position, and separated wet and clean zones, tested mounted rather than on a bench.
Can wind open a roll-top dry bag on a motorcycle?
Yes. Air force rises with the square of speed and a broadside roll can scoop air. Keep three folds, face the roll rearward and add collar compression.
How far from the exhaust should luggage sit?
Aim for 150 mm of free clearance and reject under 100 mm without a shield. Measure loaded and confirm with a hot-soak temperature test.
Why do straps loosen during a ride?
Cyclic vibration lets wet webbing creep through the buckle. Test webbing and buckle together under repeated load and capture every strap tail.
Should wet rain gear share a bag with clean clothes?
No. Use a drainable external sleeve for wet kit and keep the helmet, electronics and insulation in a separate clean lined compartment.
What capacity is right for a multi-day motorcycle tour?
Typically a 35 to 55 L tail duffel plus 20 to 30 L of pannier volume, quoted at usable three-roll capacity and within the rack and vehicle payload limits.